Monday, December 31, 2012

Pan-Fried Tofu with Spicy Sweet Sauce

There are several vegetarian blogs on the net which give one lots of great food ideas.  One of my favorites, with Toni Fiore, had a recipe using tofu to make a nice crispy sandwich filling.  Below is my version.

You will need firm or extra firm tofu.  In a large flat pan, such as a half- or quarter-sheet pan, place an absorbent kitchen towel, topped with three layers of white paper towels.  Slice your blocks of tofu across horizontally in four slices then place each slice on the paper towels.  Continue until you have all your slice tofu on the pan....which assumes you will do several blocks of tofu for your treat!

Place three more layers of white paper towels and another absorbent kitchen towel then top with a pan of the same size.  Place a weight on top of the pan...a good sized weight, like a couple of bricks or several cans of vegetables or whatever you have in your pantry.  Be sure that the weights a spread out equally.

After about an hour of being weighted down, remove all the layers of towels and you will find your tofu is about half as thick as it was previously. You are now ready to dredge it in a pan of cornstarch into which you have shaken some salt and pepper.  Dredge both sides well then place in a hot pan which has had canola oil heating.

You can see the cornstarch left on the plate...
Fry the tofu slices until they are solidly golden brown on the bottom, then turn them over for the other side to get golden brown.  Only flip them one time or you can break up the tofu...not that this is a bad thing, but it won't fit on your sandwich as well.

When the tofu is nicely fried, place it on a plate to be doused with spicy sweet sauce or onto a slice of bread or into pita bread as the beginnings of a sandwich.  You can add lettuce, pickles, tomatoes, onions, peppers, or whatever you like for the sandwich.

If you just want to eat this out of hand,  put a couple of pieces on your plate then sauce it with spicy sweet sauce which you can find in an Asian market.  This is the sauce I use and absolutely LOVE!  I think I will try it on other foods now!


Saturday, December 15, 2012

Miso Soup Broth

Having become enamored of miso soup on a trip to Utah some years ago, I have learned how to make it at home.  It is a very simple recipe.

In a small saucepan, place 3 cups of water and bring to a boil.  Add one teaspoon of Hon-dashi, which you can purchase at an Asian market, and stir well.

Get out your small stainless steel strainer and place in it one tablespoon of miso paste...red, yellow, or white.  I have tried the sweet white (though I don't know why it is called 'sweet') and the red, and like both of them.

Remove the boiling water and Hon-dashi from the stove and stir the miso paste through the strainer into the Hon-dashi water.  When the miso has dissolved in the water mixture, pour it into a mug and top with any amount of finely sliced green onions/scallions, and drink up when it is cool enough.

If you like seaweed, you can add some seaweed to the boiling water until it re-hydrates.  For myself, since the first time I made it, I overdid the seaweed, and have since not used it at all. I will probably go back to it, but will break it up much more and will only put a tiny bit of it in the soup.

Filling and delicious soup.  It has helped me drop my weight, which is a very very good thing!

Red miso paste and Hon-Dashi are the main ingredients with water.

Sliced scallions add a lot to the soup.  Try not to think it looks like dishwater.  That will put you off this delicious soup.

Monday, October 22, 2012

Apple Pie Jam

Apple Pie Jam
   
               9 large sweet-tart apples, cored, peeled and sliced  (I did not peel them, just cut them pretty finely)
               1 tablespoon lemon juice
               1 cup brown sugar
               1 1.75-ounce package lower sugar pectin
               1 teaspoon ground cinnamon
               1/4 teaspoon lemon zest (I did not use this)
               1/4 teaspoon ground ginger
               1/8 teaspoon freshly grated nutmeg
               1 cup apple cider
               1/2 teaspoon butter

In a large saucepan, toss the prepared apples with the lemon juice. Sprinkle the apples with the brown sugar, pectin, spices and lemon zest. Add the butter to the pan and pour the apple cider over the spiced apples. Heat the mixture over medium-high heat until it comes to a full, rolling boil.
Cook the apple pie jam, stirring frequently, for 5 minutes. Remove the jam from the heat and spoon it into sterile jars. Store the jam in the refrigerator for up to 7 days.
This apple pie jam recipe makes approximately 9 half-pints. (or, you might say--one wide-mouthed quart plus a little)

This stuff is pretty good, but depending on your waist measurement, you might not want to eat a lot of it...
 

Overnight Cinnamon Buns

Overnight Cinnamon Buns


For the dough: 
  • 2 Tbs. (2 package) active dry yeast 
  • 1  cup warm water (105°F) 
  • 9  cups all-purpose flour, plus more as needed 
  • 8 eggs 
  • 1/2 cup granulated sugar 
  • 1 Tablespoon plus 1 tsp. kosher salt 
  • 1 cup (2 stick) unsalted butter, at room temperature 
  •   
  • 8 Tbs. (1 stick) unsalted butter, melted 
  • 1/2 cup granulated sugar mixed with 1 Tbs. ground cinnamon 
  •   
For the glaze:  
  • 2 cup confectioners’ sugar 
  • 1/2 tsp. kosher salt 
  • 2 Tbs. unsalted butter, melted 
  • 4 Tbs. milk 
  •   
Directions:
To make the dough, in the bowl of a stand mixer, sprinkle the yeast over the water, allow to sit for a few minutes to begin blooming, then whisk until smooth. Whisk in 1 cup of the flour. Cover with plastic wrap and let stand in a warm spot, about 30 minutes.

Add the eggs, granulated sugar, salt and the remaining 8 cups flour to the yeast mixture. Fit the mixer with the dough hook and knead on medium speed until smooth, 3 to 4 minutes. Add the room-temperature butter which you have cut into chunks and continue to knead, adding a little flour to reduce stickiness if needed, until the dough is smooth, 10 to 12 minutes. (Next time I will add the butter at the same time I put in the eggs, etc, and see what happens.  Not all the butter made it into my dough, getting caught under the lid of my Bosch mixer cover...You may figure out a better way yourself...) Cover the bowl with plastic wrap and let the dough rise until doubled, about 2 hours.

Butter a half-sheet pan. Transfer the dough to a floured work surface. Roll out into a 30-inch by-10-inch rectangle. (If this is not do-able on your kitchen surface, divide dough into two pieces and roll each into a 15-inch by 10-inch  piece then proceed.) Brush the rectangle with half of the melted butter, leaving a 2-inch-wide strip uncovered on one long side. Sprinkle the cinnamon sugar over the butter. Starting at the long side covered with sugar, roll up the rectangle snugly and pinch the seam together. With the seam facing down, cut into 24 equal pieces. Place the pieces, cut side up, in the prepared dish. Brush the rolls with the remaining butter. Cover with plastic wrap and let rise in the refrigerator overnight. (You may need to plan ahead for this part as your refrigerator may need emptying/cleaning!)

The next morning, remove the rolls from the refrigerator and let rise until half again as high, about 1 hour. Preheat an oven to 350°F. 

Bake the rolls until golden brown, about 30 minutes. (Mine took 35 minutes at heat plus 2 more minutes with the heat off.  There are few things more disappointing than an uncooked cinnamon bun for which your mouth has watered for hours!) Let cool in the pan for 15 minutes.

While the rolls are baking, make the vanilla glaze: In a small bowl, sift together the confectioners’ sugar and salt. In a separate bowl, whisk together the butter, milk and vanilla, then stir into the sugar mixture to form a smooth paste. Spread the glaze over the warm rolls and serve immediately. Makes 10 large rolls.

Adapted by me who found  this recipe online where it was adapted by Williams-Sonoma Family Meals, by Maria Helm Sinskey (Oxmoor House, 2008).

Overnight Cinnamon Buns--successful!  Only one brief episode of "breakfast bell"!

Millet Loaf

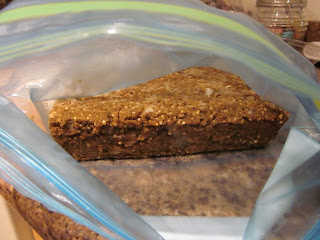
Millet Loaf as I made it!

Serves 8

1/2 cup cashews
1 cup water
1 cup Italian bread crumbs
1 1/2 cups cooked millet
1/2 quick or old-fashioned oatmeal
1 medium onion, chopped fine
1 Tablespoon poultry seasoning
1 teaspoon sausage seasoning
2 Tablespoons soy sauce

Put the water and cashews in a blender jar and blend until completely smooth...a couple of minutes.  Put all the rest of the ingredients into a large bowl and pour on the cashew/water slurry and mix well.  Pack into a greased loaf pan.  Bake at 350 degrees F. for 25-30 minutes.  Take out of pan and serve immediately or cool and serve later.  You can use a gravy on top.  I used a slice on some whole wheat bread with mayonnaise as a sandwich. 

Next time I will use lettuce and tomatoes and maybe even an onion slice.  ALSO: next time I will lightly sautee the onion before mixing it into the other ingredients.  I liked it as it was but non-onion-lovers might be less happy with the "bite" of the onion if you cook this as listed.


These can be formed into patties and browned in a greased skillet instead of cooked in a loaf pan.  Can also be cooked in a casserole dish, maybe with catsup on top?

Since these have not yet been big sellers at our house, the next time I eat a slice, I will slice it rather thickly and brown it is a skillet with a little butter or olive oil or both! 

Wednesday, August 29, 2012

Hot Dog Relish...DONE!

The last of the green tomatoes were made into relish yesterday and today. Well, on Monday I ground up all the vegetables and put them in the bucket to salt overnight, then yesterday did the cooking.  Not enough time or energy was available to do the actual canning, so this morning early I brought the relish to boiling again and gave it a good boil while the water in the canner was coming up to temperature, then in they went.  Now they are done.  Hooray!

Here is the recipe I used...and tripled it-- which made 7 quarts and three smaller jars of mixed sizes to put in our refrigerator and to give as gifts.


Green Tomato Hot Dog Relish 18 August 2012

Ingredients:
  • 8 cups finely chopped (processed or ground) cored green tomatoes
  • 2 cups finely chopped (processed or ground) peeled onions
  • 4 bell peppers, part red, finely chopped (processed or ground)
  • 1/3 cup pickling salt
  • 2 tablespoons mixed pickling spices
  • 1/2 teaspoon celery seed
  • 1 clove garlic, chopped
  • 2 1/4 cups white vinegar
  • 1 2/3 cups packed light brown sugar
Preparation:
Combine the chopped vegetables and salt in a large stainless steel pan. Cover and let stand in a cool place (about 65° F to 70° F) for 10 to 12 hours, or overnight. 

Pour the vegetables in a colander over the sink and let drain. Rinse with cool water and use your hands to squeeze out any excess liquids.  If you triple the recipe as I did, you will have to do this a batch at a time.

Tie the pickling spices and celery seeds in a cheesecloth spice bag.  Since I did not have a cheesecloth bag, I used some old white knit fabric and tied some cotton yarn around it multiple times as I did not want the spices to inadvertently come out of the bag into the relish.  That would have been too nasty for words.  We want the flavor, not the crunch of bay leaves, orange peel, peppercorns, etc.
 
In a large stainless steel, combine the vinegar, the spice bag, chopped garlic, and the vinegar. Put the vinegar mixture over high heat and bring to a boil, stirring until sugar is dissolved. Add the drained green tomato mixture and bring the mixture to a boil. Reduce heat to medium-low and boil gently, stirring often, for 1 hour.

Fill hot, prepared jars and remove any air bubbles with a small plastic spatula, leaving 1/2-inch headspace. Clean jar rims and fit with lids and rings. Process in a covered boiling-water bath canner for 10 minutes. Turn off heat, remove the cover, and let jars stand in the hot water for 5 minutes. Remove to a rack to cool completely. 

Makes about 7 half-pint jars of relish.

Saturday, August 18, 2012

Piccalilli/Chow Chow/Green Tomato Relish

Today, thanks to the great generosity of the Fogg family, I have made a first run at canning for the 2012 season. I made seven quarts, plus a little for the refrigerator, of piccalilli.  The recipe follows:


Chow Chow--Piccalilli --Green Tomato Relish


Piccalilli 2012


Ingredients:

  • 4 quarts chopped green tomatoes  (yes!  16 CUPS of chopped green tomatoes)
  • 4 quarts coarsely chopped cabbage (it took 2 cabbages which were only about medium size--be sure to measure)
  • 3 cups finely chopped yellow onion or sweet onion
  • 2 cups coarsely chopped red bell pepper
  • 1/3 cup kosher salt or pickling salt
  • 1 1/2 QUARTS cider vinegar
  • 2 cup light brown sugar, packed
  • 1 cup white flour
  • 1 tablespoon yellow mustard seeds
  • 1 teaspoon ground allspice
  • 2 teaspoons celery seed

Preparation:

Combine the chopped vegetables in a VERY large nonreactive kettle or bowl. (I used our large food processor and pulsed until they were the consistency I like for relish.)  Add the salt and stir to combine thoroughly. I used my clean hands to do this.  Cover and let stand for 4 hours or refrigerate overnight.  Not having enough empty space for the 13-quart bowl, I went the 4-hour route.

Drain the vegetables and rinse thoroughly. This will take some time.  I had a colander in the sink and dipped the vegetables into a long-handled sieve set into the colander then ran cold water through them.  After draining well, I put them into another large bowl.
 
In a large stainless steel kettle, bring the vinegar, brown sugar, and seeds and spices to a boil. Reduce heat to medium low and continue simmering for 5 minutes. Add the drained vegetables and bring back to a boil. Reduce heat to medium low and simmer for about 30 minutes, stirring often.

Prepare the canner and jars by adding water about halfway up the canner. Cover and bring water to a boil.  While water is coming to a boil, wash jars thoroughly and set into canner rack.  In a small pan place hot water and bring to a simmer.  Place the jar lids in the pan and set to low simmer. 

At this point, with the canner water nearly hot, put a canning funnel into the first empty hot jar and ladle in the piccalilli relish, being absolutely certain not to get any juice or vegetables on the jar ring.  With a long-handled clean wooden spoon, or plastic canning gadget, reach into the jar and release any air pockets.  Make sure that there is juice enough to cover the relish.  Fill to one-half inch from top of jar.  Run a clean damp cloth around the top of the jar then place a hot lid on the jar then follow with a clean jar ring.  Finish filling the other six quart jars and tighten the jar rings.

 Very carefully lift the rack of filled jars into the boiling water in the canner.  If it looks like you are going to overflow the canner, put the rack back on the counter and take out 2 or 3 quarts of water and try again.  Be sure there is about one inch of water covering the top of the jars.  When the water returns to a boil,  let boil for at least 15 minutes.  If you are somewhat nervous about home canning, botulism, or other icky things,  you can process/boil for as long as 25 minutes.  Add more water as needed to keep the jars well covered.

When you are happy with the processing time, carefully remove the VERY HOT rack of beautiful piccalilli from the canner and set on a towel covered counter or table to cool.  Very shortly you should begin to hear "ping", "ping", "ping" as the jars seal.  Listen until you have heard all seven lids ping before leaving the room.  If you fail to wait to hear the pings, you will need to tap the middle of the lid later when you return to the room.  The lid should be depressed (but not unhappy!!!) and remain that way.  They are now safe to store away on your canning shelves in the cellar or wherever else you store them.  If there was a little left over from the jars, put it in a small jar or jars and refrigerate until you gobble it up.

This makes 7 quarts.  If you really like processing you can put it into smaller, or ever smaller jars an have many many jars on your shelves waiting to give away as Christmas, or other, gifts.